However, things are looking up; under a Department of Transportation (DOT) ruling that went into effect March 6, 2015, airlines are now required to allow small instruments in the cabin as part of a passenger’s carry-on allowance. (Code of Federal Regulations (CFR) Title 14, Part 251).
But What About Cellos?
While the DOT ruling is very clear in regard to smaller instruments, it is not as definitive when it comes to larger ones. With cellos, standard practice is one of two things: use a flight case and gate check the instrument (checked baggage), or purchase another seat in the cabin for the instrument. Both options have their benefits and disadvantages, so it is up to you to decide what you are most comfortable with:
Putting your cello in checked baggage
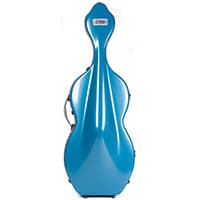
- Make sure you have a sturdy flight case or cover you can use. Covers normally go around a hard case, while dedicated flight cases are heavy-duty and designed to protect the instrument without additional parts. They can be purchased or rented depending on the type you are looking for. Just as you would a package, mark it clearly as FRAGILE, MUSICAL INSTRUMENT, or any other polite message that states it needs to be treated with care.
- Make sure your instrument is padded within the case. Use wadded tissue paper, cloth, or old clothes to support the bridge, fingerboard, and tailpiece as well as around the sides of the instrument to prevent any jostling around inside the case.
- Flying with the cello introduces environmental changes that can affect the setup. The safest option, if possible, is to have a luthier take down the entire setup and have another set it back up when you arrive at your destination. If that is not possible, you can tune your strings down by a half step to a third before packing it away.
- Understand that others will be handling your instrument and plan accordingly. There is a lot of baggage to handle and things are not always treated as delicately as they should be–we’ve all watched luggage being loaded onto a plane. If you want to avoid the baggage claim process, see if your airline offers to check your instrument right at the gate, so they can hand it off to you immediately after disembarking.
Bringing your cello into the cabin
- When buying your extra ticket (which should always be done when going this route), make sure you are not buying a seat where the cello will block any emergency exits or signs. Airlines can make a case to have the instrument checked if it threatens passenger safety.
- Contact the airline when you buy the ticket to make sure everything follows their safety policies. This will ensure you are in compliance and allow you to confirm you provided advance notice about the cello.
-
Some cellists have been able to fit their instruments in the overhead compartments of larger planes. This is something that cannot be guaranteed, but if you are thinking of trying it there are a few things to keep in mind:
- Board early. If you need to pay extra to do so, it may be worth it to ensure that you have enough space to get your instrument in the overhead first. Like the DOT ruling says, if it fits in the overhead compartment and you put it there first, your instrument is entitled to stay there.
- Some cases work better than others. Most anecdotal evidence of cello cases fitting in these compartments happened with the Accord cases, specifically the Hybrid and the UltraLight.
- THE AIRLINE CANNOT CHARGE YOU MORE THAN THE COST OF THE SEAT FOR THE INSTRUMENT. To quote directly from the final ruling: “…assuming all of the safety requirements are met, carriers cannot charge the passenger more than the price of a ticket for the additional seat….” This doesn’t mean that if you decide to upgrade your seat your cello gets a free bump. It also doesn’t mean that you are exempt from fees that are normally posed on carry-on items or cargo. What it does mean is that they cannot charge you extra just because a cello is occupying the seat instead of a human being.
General advice for flying with a cello
- Check your instrument insurance. There is a limit to an airline’s liability if your cello is lost, damaged, or delayed. In many cases this only covers a fraction of the instrument’s value. Make sure you are covered for air travel by your insurance provider.
- Arm yourself with information: bring a copy of the DOT ruling and your airline’s instrument policy with you. Be firm but polite if an issue arises.
- Make sure you have a high-quality hard case, such as the ones found in our store or on our website. If you are purchasing a seat for your instrument, make sure it’s a lighter and less bulky case such as Bam, Accord, or Galaxy. If you have a flight cover for checking your cello, make sure the case will fit inside the cover.
- Check in as early as possible. It may take longer to do so and get through security because of the instrument. Make sure to leave yourself enough time so that you are not running for the gate. If you are comfortable doing so, paying for early boarding will also give you a space advantage when getting your instrument situated in the cabin.
Hopefully with these tips in mind, both you and your cello will have a safe flight!